

Introduction: Lighting Over Luxury Gear
When it comes to cinematic music videos, lighting matters more than fancy cameras or costly gear. A well-lit scene can make footage from a humble DSLR or even a smartphone look high-end, while poor lighting will make even expensive equipment look amateur. In fact, many pros say it really comes down to the lighting and the edit[1]. The reason is simple: cameras (especially phone cameras) struggle in bad light, producing grainy, dull images. But with great lighting, your video can look “expensive” even on a tiny budget[2]. Good lighting is arguably the biggest factor in achieving a cinematic look, far more than the camera you use[1][2]. As one filmmaker put it, “the better the lighting the better the video”[2]. Lighting sets the mood, draws attention to your subject, and adds depth and polish that scream professionalism. This means independent artists and low-budget creators can punch above their weight by mastering lighting fundamentals. In this guide, we’ll explore exactly how to do that – from core principles like contrast and color, to real-world techniques used in hip-hop/R&B videos, to affordable tools and creative tricks. By the end, you’ll have cheap lighting music video tips to make your next project look cinematic without breaking the bank.
Key Lighting Principles for a Cinematic Look

Even without Hollywood resources, you can apply the same core lighting principles that make big-budget videos shine. Understanding these basics will help you light with intention and style:
- Contrast (Light and Shadow): Cinematic images usually aren’t flat – they have contrast. This means a mix of brighter areas and deep shadows to create depth. Don’t be afraid of shadows; they add drama and dimension when used purposefully. For example, using a strong key light from one side and a weaker fill light on the other creates shape on the face (think of the classic “Rembrandt” lighting triangle on the cheek). High contrast lighting (with darker shadows) tends to look more dramatic and “expensive” than flat, even lighting[3]. A spotlight or backlight can throw parts of your scene into shadow and make your subject pop, as seen in many moody music videos. Just be sure the contrast serves the mood – a soulful R&B ballad might use softer shadows than an edgy rap video. The key is to avoid the #1 amateur mistake: flat lighting with no shadows or depth[4]. Always aim to have some interplay of light and shadow to give a three-dimensional, cinematic feel.
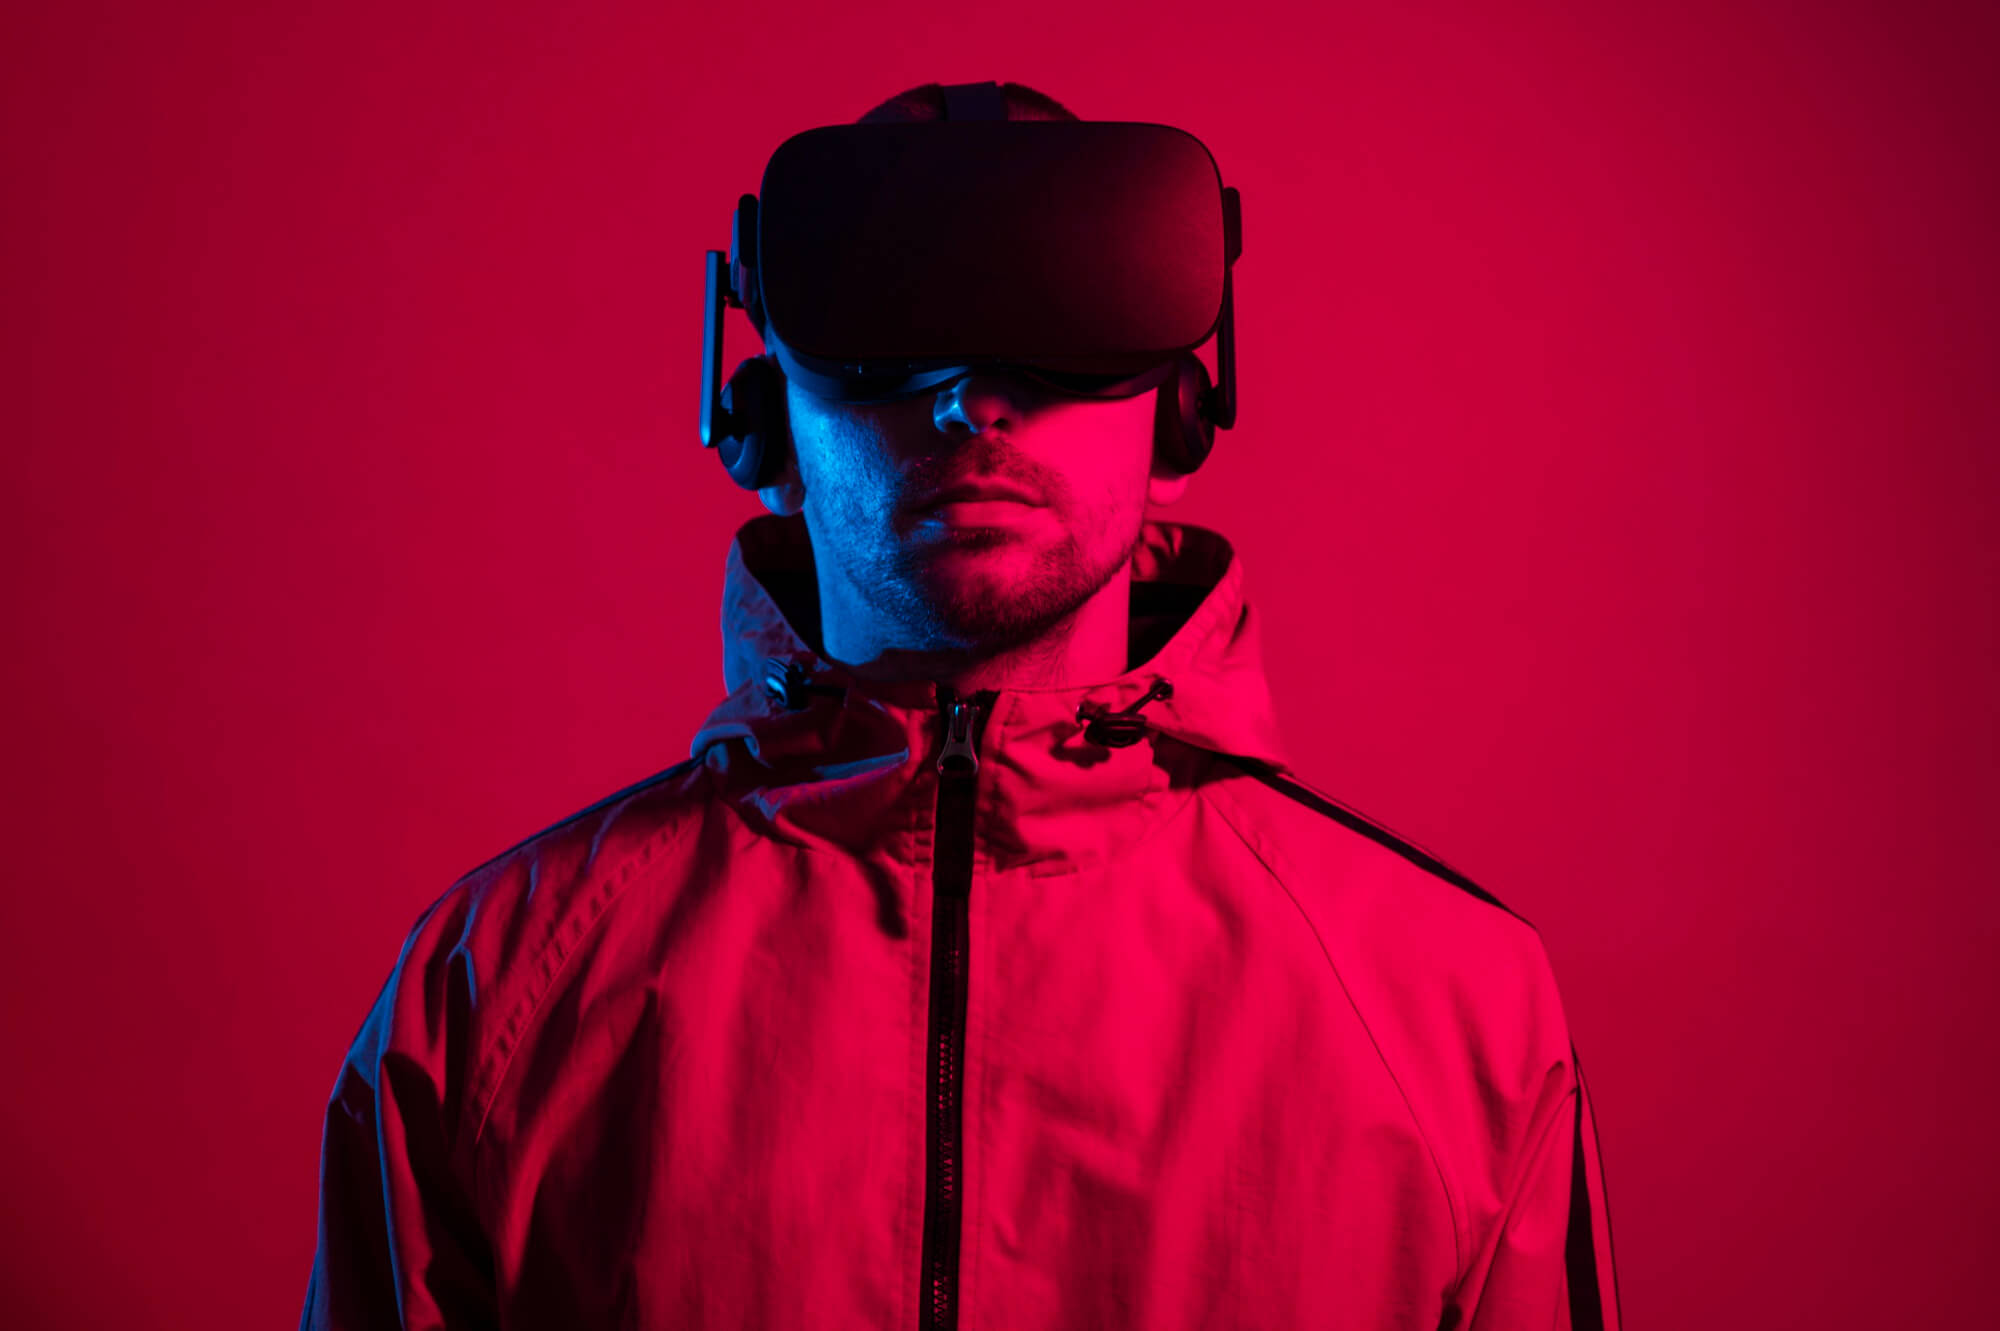
- Color Temperature: Light has color, from warm (orange) to cool (blue). This is measured in Kelvin and often referred to as color temperature. Cinematic lighting uses color intentionally to set mood. For instance, a warm golden light (around 3200K) can feel intimate or nostalgic, while a cool blue light (5600K and above) can feel stark or night-like. Keep your color temperatures consistent or deliberately stylized. One common mistake is mixing a warm lamp with cool daylight in the same shot – this can confuse your camera’s white balance and look odd (faces may turn out too blue or too orange)[5]. Instead, decide on a dominant color tone for the scene. You might use warm key lighting for a club scene to feel sultry, or add a cool fill to suggest moonlight. Many cinematic hip-hop/R&B videos play with color gels and LED lights – e.g. a red light from one side and blue from the other – but these are still motivated by the scene’s vibe (perhaps neon signs or club lights in the environment). The takeaway: choose your lighting color palette on purpose. Match it to the song’s mood, and be mindful of balancing different light sources so they don’t clash. When in doubt, stick to one color temperature at a time or gel your lights to match each other.
- Soft vs. Hard Light: The quality of light – how soft or hard it is – has a huge impact on the “expensive” look. Soft light (diffused light that wraps gently, with soft shadows) is generally more flattering on faces and has a high-end feel. It’s achieved by using large light sources or diffusion materials (like softboxes, umbrellas, or even a white bedsheet) to scatter the light. Hard light (small, direct, undiffused) creates sharp shadows and intense contrast. Neither is “good” or “bad” universally – they’re creative tools. Soft light is common in cinematic R&B or pop visuals for a glamorous, creamy look on skin, while hard light might be used in a gritty rap video for dramatic effect. For example, a single bare bulb or spotlight can give a stylized hard-light look with defined shadows (think of a lone rapper under a streetlight). Meanwhile, a Chinese lantern or LED panel with diffusion can bathe a singer in a soft glow that feels luxurious. The key is to choose softness/hardness based on the mood and to avoid unflattering extremes. Harsh overhead hard light (like an undiffused ceiling fixture) can create ugly “raccoon eye” shadows and instantly make a shot look cheap. Simply diffusing that light or bouncing it off a wall can soften it and elevate the scene’s quality[3]. As a rule, light people with softer sources (or bounce the light) for a high-quality look, and use harder lights sparingly for accents, rim lighting, or stylized drama.
- Motivated Lighting: Motivated lighting means your light sources feel natural and logical in the scene[6][7]. In other words, even if you’re using film lights, they’re set up to mimic real sources like sunlight, lamps, neon signs, car headlights, etc. This principle is crucial for making a low-budget video look cinematic: the audience shouldn’t be distracted by lighting that feels “fake” or out of place. For example, if your scene is in a bedroom, use a lamp on the nightstand (or a film light placed where the lamp is) to create a warm glow – the viewer will accept that light as coming from the lamp. If you splash a crazy color across the singer’s face, have an obvious source for it (maybe a “neon” practical light in the frame or the glow of a TV screen). Motivated lighting keeps your video grounded in a cinematic reality[6][7]. It’s fine to use unconventional colors or angles as long as you can justify them. Many music videos use practical lights (actual visible light fixtures on set) to enhance motivation – e.g. the artist standing under a streetlamp, or LED tube lights in the background of a performance scene. By contrast, one thing that makes amateur videos look cheap is light that seems to come from nowhere (e.g. an obvious spotlight on a singer in the middle of a field with no streetlights or source in sight). So always ask: “Where would this light be coming from in real life?” Then set up your lighting to reinforce that illusion. Motivating your lights will instantly make the video feel more high-budget and immersive[7]. (Of course, you can break this rule for stylized looks – some artistic videos use abstract lighting – but if you’re going for a cinematic narrative vibe, motivated lighting is gold.)
Cinematic Lighting Techniques in Hip-Hop, Rap & R&B Videos
Certain lighting techniques show up again and again in hip-hop, rap, and R&B music videos because they create bold, cinematic visuals. Let’s look at a few and how you can emulate them:

- Colored Lighting and Gels: Urban music genres often feature rich color lighting to convey mood. Think of a music video where the scene is washed in deep red or moody blue – this is a staple of contemporary hip-hop/R&B visuals. Many DPs achieve it with colored LED panels or tube lights placed just off-camera. For example, you might use a red-backlight and a blue key light on your artist to create a dynamic two-tone look. In one breakdown of a hip-hop video shoot, the cinematographer used colored LED tubes to cast cool effects on the performers, even using them to hide less attractive parts of the location[8]. That shows how creative lighting not only sets tone but can also mask a cheap set (e.g. placing bright colored lights in the background draws the eye away from plain walls). You can easily get this look on a budget with tools like inexpensive RGB LED strips or bulbs with gels. For instance, put a blue gel over a cheap work light for one side of the scene and a red gel on another light for the opposite side – instant “rap video” vibe. Just remember motivated lighting: if you bathe a scene in neon colors, justify it by the environment (perhaps imagine neon signage or LED panels in a club). Used wisely, bold colors can make your video feel like a big-budget production with creative lighting design.
- Dramatic Silhouettes and Backlighting: A common cinematic technique is to heavily backlight your subject and let the front fall partially into shadow, creating a striking silhouette or rim-lit profile. We see this in many R&B videos where the singer might be in front of a bright window or sunset, appearing as a glowing outline. Backlighting separates your subject from the background and adds depth – it’s a trick that instantly adds a professional sheen[9]. One Reddit cinematographer advises, “If you have lights, backlight the [subject]… to give them depth. Most videos have some form of backlight on the talent”[9]. In the hip-hop world, backlights are often combined with haze or smoke to make visible light rays (those cool light beams you see in a smoky warehouse or on stage). For example, a rap video set in a dark warehouse might use a strong spotlight from behind the rapper, with a fog machine to create dramatic light streaks through the air. R&B videos might use softer backlights – imagine a singer in a dim room with just a lamp behind them giving a halo effect. A famous example of minimalist, backlit lighting is Beyoncé’s “Single Ladies” video, which uses stark spotlighting on a plain background – a masterclass in how lighting and choreography alone can carry a video[10]. That video shows you don’t need elaborate sets at all; a well-placed hard light creating contrast and defined shadows can look incredibly high-end. To try this, position a bright light behind or 45-degrees behind your artist (out of frame) to outline them, and use just a bit of fill in front to prevent total silhouette unless that’s your aim. You’ll get that dramatic music video look that adds instant production value.
- High-Key vs. Low-Key Lighting: Hip-hop and rap videos often alternate between high-key lighting (bright, evenly lit scenes like a flashy party or dance sequence) and low-key lighting (darker, moodier scenes with selective highlights). Knowing when to use each can elevate your video. A high-key setup might be used in an upbeat club scene – lots of fill light, everything visible and vibrant. A low-key setup might be used for a narrative cutaway or emotional moment – e.g. the rapper alone under a single light in an otherwise dark room. Low-key lighting, with its shadows and mystery, generally looks more “cinematic” and is common in serious or moody tracks. Many R&B visuals favor low-key, with just faces lit and backgrounds falling off dark. On a budget, you can achieve low-key looks by turning off or dimming all non-essential lights and using one primary source, like a single softbox or a window, to illuminate the subject and let the rest fall into shadow. High-key looks, conversely, require filling in shadows – you can bounce light with reflectors or use multiple light sources to reduce contrast. Just be cautious: too high-key (lighting everything flatly) can look like a cheap soap opera or home video. Even in brighter scenes, try to maintain a bit of shading/contrast for texture.
- Practical Lights as Props: In many music videos, especially R&B, the lighting isn’t just coming from off-screen film lights – you see light sources in the frame that double as set decoration. These are practicals and they add a ton of cinematic value. Examples: a row of vintage lamps around the artist, LED strip lights on the walls, neon signs flickering behind the DJ, candles on a table, or even car headlights pointed toward the camera in a nighttime outdoor scene. Using practicals serves two purposes: it motivates your other lighting (as discussed) and it simply looks cool and polished. An empty warehouse looks plain, but put a few colored LED tubes in the background and suddenly it feels like a styled set. A simple bedroom scene looks more expensive with fairy lights or a neon sign in the background casting a glow. In hip-hop videos, car headlights or LED panels are often visible in-shot, creating lens flares and a gritty vibe. R&B videos might use something like a projector or old TV to cast light onto the singer for an artsy effect. So, don’t hesitate to incorporate light sources into your scenes visually. A string of cheap Christmas lights can give a creative bokeh glow; a $10 thrift-store lamp with a smart bulb can bathe a corner in color. These touches make your video feel professionally lit and art-directed, even on a shoestring.
Affordable Lighting Tools and Tricks for Indie Artists

You might be thinking, “This sounds great, but what if I can’t afford professional lights?” The good news is you don’t need an Arri HMI or expensive kit to get cinematic results. Indie filmmakers have long been resourceful, using household items and budget gear to light creatively. Here are some affordable tools and tricks to make your music video look pro:
- LED Panels and Budget Kits: In recent years, LED video lights have become very affordable. Brands like Neewer, Godox, and Aputure offer small LED panels and wand lights under $100 that can be game-changers. A basic LED panel kit (often sold as 2-panel sets) gives you a controllable, dimmable light source with adjustable color temperature. These are great as key or fill lights. For example, the Neewer 2-Pack LED panel kit is a popular choice for musicians on a budget – it’s compact but powerful, with brightness and color adjustment to help set your scene’s mood[11]. If you’re really tight on cash, even a ring light (normally used for vlogging) can work for a solo performance shot; it provides a soft, even glow on a singer’s face and eliminates the “cave with a flickering bulb” look[12][13]. The key is to invest in one or two decent lights or repurpose lights you already have at home.
- Household Lamps and “Practical” Fixtures: Look around your house for lighting – you probably have more than you think. A desk lamp, a floor lamp, an IKEA paper lantern, even the flashlight on your phone can be used to light a scene in creative ways[14][15]. The motto of no-budget filmmaking is “do what you can with what you have.” Can you light a whole warehouse with one desk lamp? Probably not, but you can light an intimate close-up with one[14]. Standard household bulbs (preferably LED or CFL for cool operation) can be fitted into clamp lights (those silver reflector lamps from a hardware store) which cost maybe $10 each. These allow you to position and aim light easily. Add a $5 white shower curtain or wax paper as diffusion, and you have a soft light! If the scene calls for warmth, use a warm bulb; for daylight, use a cool bulb. Pro tip: use practicals in the scene too. For example, place a lamp in the shot as a prop and boost its bulb wattage to have it actually light the performer. This way, your light source doubles as set dressing and motivated light. One musician recounts streaming under just a ceiling light and looking ghostly, until they added a simple ring light – it instantly made them look “professional and polished”[13]. The takeaway: even a cheap lamp placed correctly can elevate your image.
- Bounce Boards and Reflectors: Light bounces – and you can use that to your advantage for free. A bounce board is anything white or reflective that you use to reflect light into shadows. Professional reflectors are inexpensive (5-in-1 collapsible reflectors often under $30), but you can also use white foam board from the craft store, a poster board, or a DIY solution like covering cardboard with aluminum foil. For instance, if you have one strong light on one side of the artist (key light), you can bounce some of that light back from the opposite side to fill in shadows subtly, instead of using a second light. This creates a nice wrap of light without needing extra gear. In an outdoor shoot, a bounce can redirect sunlight onto your subject’s face (great for golden hour portraits). You can also bounce light off walls or ceilings to get a soft fill; an IKEA floor lamp pointed at a white wall will create a gentle ambient light in the room[16]. Bouncing is an indie filmmaker’s friend – it’s like doubling your lights for free. And remember, even car sunshades or foil-covered boards can serve as reflectors in a pinch.
- DIY Diffusion and Light Control: Cinematic lighting often requires softening lights and flagging (blocking) unwanted spill. You don’t need Hollywood silk diffusers or barn doors – you can DIY this. Thin white fabric, wax paper, baking parchment, or shower curtains can all act as diffusion in front of a harsh light to make it soft. Just be careful with heat if using hot lights. As for controlling light spill or creating shadow patterns, try DIY flags and cookies: black poster board or foam-core can function as flags (to block light from hitting certain areas or the camera lens). Even something as simple as black trash bags or pieces of cardboard have been used on sets to shape light[17]. One music video DP literally used garbage bags to flag off light spill on a low-budget shoot[17] – it works! You can also cut shapes in cardboard to create a cookie (for example, simulate window blinds shadows by cutting parallel slits and shining a light through onto a wall). These little tricks add a professional look without costing more than a few dollars.
- Cheap Color Gels and Filters: If you want those cool colored lights we talked about, you don’t need RGB LEDs necessarily – you can get color gels (transparent colored sheets) very cheaply and put them over any light source. A pack of small gels (red, blue, green, etc.) often costs under $20. Tape a gel in front of a clamp light or LED panel, and voila – you have a colored light. Want that edgy purple-pink hue for a vaporwave R&B vibe? Use a combination of a blue and red gel on two different lights. Gels can also be used to correct mismatched color temperatures (CTO gels to warm up daylight-balanced LEDs, for example). If gels aren’t handy, even cellophane gift wrap or sheer fabric can tint a light in a pinch (just be mindful of melting if the light runs hot). Also consider practical colored sources: neon signs (some can be found cheap online), smart LED bulbs (which can change color via app), or even a laptop/TV screen displaying a solid color can cast a glow on your subject. Independent creators have used everything from police siren toys (for flashing red/blue lights) to LED Christmas lights to add color excitement to scenes. Be creative – as one cinematographer noted, “take inventory of the lights you have… overhead fixture, desk lamp, smartphone flash, Christmas lights… I can do a lot with these!”[18][15].
- Battery Lights and Unconventional Sources: If you’re shooting on location with no power outlets (say, outdoors at night), consider battery-powered lights. There are affordable LED panels and even DIY options (like hooking LED light strips to a battery). Construction work lights from a hardware store can run on batteries and provide strong output[19]. A filmmaker on StackExchange mentioned using flashlights (MagLights), car headlights, even a campfire as viable sources for a warm, dramatic look[20][21]. Car headlights, for example, can be an awesome impromptu lighting kit – park a car and have it backlight the band or artist at night, maybe slap some diffusion (tracing paper or a pillowcase) over the headlights for a softer beam. It creates a cool silhouette and costs nothing. Just be sure to white balance if the headlights are very warm. Another trick: use the sky! If you shoot during daytime, a simple reflector can bounce the sun (which is free) for fill light. At night with no lights, think of creative sources: a bonfire or even a bunch of candles can create a beautiful warm ambiance for an acoustic song segment. Anything that emits light is a potential tool – you just have to get resourceful and sometimes “MacGyver” it to be usable on camera.
Above all, remember that you can achieve a lot with limited gear by using what’s available strategically. As one guide states, even with a small budget just “use what you’ve got strategically and you can achieve some pretty great results”[17]. The combination of a few cheap lights, some household items, and ingenuity will carry you far.
Using Natural Light Effectively
Harnessing the Power of the Sun: One of the best (and cheapest) lighting sources you have is the sun. In fact, many directors prefer shooting outside precisely because sunlight can make footage look amazing with no expensive kit needed – “the sun is the best light source there is”[2]. The trick is to use natural light to your advantage rather than fighting it. For starters, plan outdoor shoots during the “golden hour” – the hour after sunrise or before sunset – when the sunlight is soft, golden, and very flattering. Golden hour sun can give you that beautiful backlit halo and rich colors that scream cinematic. For example, shooting your artist walking down the street at sunset with the sun behind them will give a gorgeous rim light and requires no gear at all. Many indie videographers swear by this: sunset behind you giving some magical golden backlight can replace a whole lighting kit[22]. The image above is a real music video shot using only the natural light from huge windows, proof that daylight alone can create a cinematic vibe[23].
If you’re filming indoors with window light, treat the window like your key light. It’s essentially a giant softbox (especially if sunlight is indirect or it’s an overcast day). Position your subject near a window for a beautifully diffused light on their face[24]. North-facing windows or those with sheer curtains give a consistent soft light that’s easy to work with. You may need to turn off other lights inside (especially ugly overhead fluorescents) to avoid color contamination and let the window be the star[25]. If the sunlight is too direct and harsh (causing squinting or hard shadows), you can diffuse it with a sheer curtain or thin white sheet over the window[24]. Also consider using a reflector or even a white poster board opposite the window to bounce some light back and fill in shadows on the off side of the subject’s face.
For outdoor shoots, timing and location are key. Midday sun is very harsh (causing hard shadows under eyes and chin), so if you must shoot at noon, try to find open shade (for instance, under a tree or on the shadow side of a building) to get a softer light on your subject. Alternatively, use a diffuser (like a translucent reflector or even a shower curtain on a frame) above your subject to soften direct sunlight. If you have an assistant or friend, they can hold a diffusion cloth to create instant shade. On bright days, also watch out for overexposure – your camera settings might need adjustment (use ND filters or higher shutter if shooting wide open). Conversely, on cloudy days, the light will be soft and even (great for close-ups), but the scene might be a bit flat; you can introduce a pop of light with a reflector or a small LED just to give some shape.
Natural light at night is trickier, because essentially you’re dealing with darkness except for street lights or the moon. Moonlight by itself is usually too dim to film (and appears very blue on camera). If you’re outdoors at night, look for available light sources: street lamps, neon signs, lit up storefronts, etc. Use those as motivated lights in your scene – for example, film under a streetlight so it acts as your key on the artist. If it’s an urban setting, you might find pools of light from windows or billboards. You can also use vehicles – car headlights can act as key or backlights (as mentioned earlier), and interior lights of a car can illuminate a close-up shot creatively. A trick for nighttime exteriors: bring practical battery lights like camping lanterns or LED panels and hide them just out of frame (or even within the scene, like a “work light” on the ground that could plausibly be there). Use the darkness to your advantage too – shadow can hide a distracting background or low-budget set, focusing the viewer on the artist.
The bottom line is, plan for natural light. If you don’t have lighting gear, schedule your shoot when the light is best (morning/evening) or pick locations that come with good lighting (a bright loft with big windows, an outdoor spot with interesting light). As Ari’s Take advises musicians, “Either shoot it outside, or plan to spend a hefty amount on good lights”[26]. With some care, sunlight can do the heavy lifting and make your video look high-end for free[2].
Lighting Indoor vs. Outdoor Scenes
Lighting needs can differ greatly between indoor and outdoor shoots. Here are some tips for each environment to keep your video looking professional:
Indoor Lighting Tips: When shooting indoors, you have full control – but you also have the responsibility to create all the light from scratch. The first step is to turn off unflattering ambient lights. Most rooms have overhead fixtures or fluorescent lights that are not ideal for video (they can flicker on camera and often cast greenish or ugly shadows). As one expert recommends, “when shooting indoors, turn off all the fluorescent lighting, so you can choose the amount and type of light that’s going to work best”[25]. Use your own lighting plan instead. Next, decide on your key light position: a common setup is 45 degrees to one side of the camera and slightly above the subject’s eye line. This creates pleasant directional light. You can use a softbox, LED panel, or a diffused clamp lamp here. Then use fill light or bounce to taste – add just enough on the opposite side to soften harsh shadows. Remember that walls and ceilings in small rooms act as bounce surfaces too; a white wall can serve as a giant reflector if you aim a light at it. Control spill: in tight indoor spaces, light can ricochet everywhere and lower contrast. Use DIY flags (black cloth or cardboard) to block light from hitting the lens or background if you want a moodier look. Pay attention to background lighting as well – indoors, backgrounds can fall off to pure darkness which sometimes looks unnatural. You might place a small lamp or LED back there to create depth (for example, a colored gel light casting a pattern on the wall, or a lamp on a table in the background of the shot). This prevents the “subject against a black void” look. Another tip: watch your white balance and color mix. If window light is coming in (cool blue) and your lamp is warm, you’ll have mixed color temps – consider using one or the other or matching them (e.g., put a CTB gel on the lamp to make it daylight-balanced, or close the window and use entirely artificial light)[5]. Lastly, indoor shoots benefit from pre-rigging if possible – set up as much as you can beforehand, because small tweaks in lighting (a slight turn of a lamp, adding a book under a light to raise it, etc.) can make a big difference and it’s easier without the pressure of a performer waiting.

Outdoor Lighting Tips: When filming outdoors, you’re working with the biggest light source of all – the sun – plus whatever environmental light is around. Time of day is your biggest consideration. As mentioned, early morning and late afternoon/evening are ideal for soft, golden light. Midday can be tough; if you must shoot under a bright midday sun, try to find shade or create your own. For example, you could bring along a pop-up 10×10 tent with a white tarp to act as a giant diffuser for group shots (if practical), or simply move under a tree. A silk sheet on C-stands can also diffuse sun if you have help. Reflectors are very useful outdoors: bouncing sunlight into the subject’s shaded side can balance out contrast (but be careful not to blind them with a mirror-like reflection – use a soft white reflector for subtle fill). On bright days, you might need ND filters on your lens to maintain proper exposure at wider apertures – otherwise everything will be blown out. On overcast days, you might do the opposite: use a small light or reflector to introduce some shadows/contrast, since clouds act like one huge diffuser and can make things look flat. For example, you could use a silver reflector from below to kick a little light up and create an interesting shadow under the chin (mimicking some directional sunlight). During night exteriors, plan how you’ll see your subject. As discussed, utilize existing lights like street lamps – maybe have the artist stand under one, or use the amber glow of a sodium vapor streetlight as your key light (it gives a gritty urban feel). If no useful ambient light exists, you will need to bring lighting. Battery LED panels hidden behind objects or placed on light stands can simulate streetlights or moonlight (set one high up with a bluish gel to mimic moonlight from above, for instance). You can even tape small LED lights to walls or use them on the ground to uplight surfaces. Safety note: if using a generator or mains power outdoors for bigger lights, ensure all connections are safe from water and foot traffic.
One more consideration: weather and consistency. Outdoors, clouds can change lighting in minutes, and passing clouds can ruin continuity between shots. Try to shoot all angles of a scene under similar conditions (e.g., wait for the sun to go behind a cloud if you started in cloud-diffused light). If the weather is variable, you may have to embrace a slightly different look in each shot or plan your coverage to minimize noticeable shifts. Alternatively, shoot fast when conditions are perfect – have your camera settings and blocking ready to go when that golden sun crests through the trees! Indoors, you don’t face weather, but you might face practical issues like power outlets or cramped quarters. Always have extension cords and maybe a couple of practical bulbs of different wattages handy when shooting inside – sometimes swapping a bulb in a practical lamp (from 60W to 25W, for example) can immediately fix an over-bright background in a house shot.
In summary, indoor lighting gives you control but demands setup; outdoor lighting gives you beauty for free but demands flexibility. Plan accordingly and you can get cinematic results in both scenarios.
Common Lighting Mistakes That Make Videos Look Cheap
Even with all the right tools and knowledge, it’s easy to fall into some common traps that scream “low production value.” Here are a few lighting mistakes to avoid if you want your music video to look cinematic:
- Flat, Direct Lighting (No Contrast): As mentioned earlier, blasting your subject with frontal light (like an on-camera light or direct flash) creates a flat image with no depth. This is a hallmark of amateur video. One award-winning cinematographer notes that mounting a light on top of the camera and pointing it at the subject results in a washed-out, “flat lighting” look[4]. It’s akin to using a built-in flash in photography – it flattens features and looks uncreative[4]. Always light from an angle and create some shadow. Too much fill, and your scene can also become flat. Aim for a pleasing light ratio (for example, key side of face brighter, shadow side a touch darker). If everything is lit equally with no shadows at all, the image tends to look cheap or like raw home video footage. Avoid the “deer in headlights” look – don’t just point a bright light straight at the artist’s face from the camera’s direction.
- Raccoon Eyes and Hotspots from Overhead Lights: Using only overhead room lights (like ceiling lights) is a big no-no if you want a pro look. Overhead lights often create dark eye sockets and unflattering shadows on faces (hence the term “raccoon eyes”). They also spill everywhere, reducing control over the scene’s look. If you film in a room with only the ceiling light on, the result is usually a flat, uninteresting scene with the subject’s features poorly highlighted. Instead, turn that light off and use your own lighting setup. Similarly, be cautious of single-point spotlights from directly above or below – these can cause weird highlights (a lamp above might blow out the top of someone’s head while leaving their face dim). The fix is to bring lights more level with the subject and diffuse them. If overhead lights are part of the environment (say you’re shooting in a store or office), consider turning some off or swapping bulbs to get a better quality of light. Harsh overhead fluorescent tubes, for example, can be turned off and replaced by your warmer LED lights so skin tones don’t go sickly green. In short, don’t rely on practical overheads unless you’ve tested how they look on camera – often they are the culprit behind a “cheap” aesthetic.
- Mixing Color Temperatures Unintentionally: We covered how using mismatched color lights can be a stylistic choice, but doing it accidentally will make your video look sloppy. A common mistake is having indoor tungsten lights (warm) and not blocking daylight (cool) from a window, leading to a scene that’s partly orange, partly blue. Cameras struggle to auto white balance in such cases, and you might get footage where the colors shift or just feel “off”[27]. The viewer may not know why it looks bad, but it will definitely not feel cinematic. The solution: pick one lighting color strategy per scene. If you have a lot of sunlight, turn off the other lamps or use daylight-balanced bulbs. If you want it warm and cozy, block the sunlight (close curtains) and just use your warm lamps. Always set your camera’s white balance manually for the main light source so that skin tones look correct. In summary, avoid ugly color casts by controlling your light sources – all warm or all cool or intentional stylized colors, but not an accidental mishmash.
- Underexposure and Noise: Some music videos try to go for a dark, moody vibe but end up simply under-lit. If your camera (especially phones or consumer cameras) is starved for light, it will raise its ISO or gain, introducing noise/grain and muddiness. Grainy, noisy footage is a quick giveaway of low-budget production (unless used intentionally for style). While mood is great, make sure your subject is lit to a proper exposure – you can always make shadows dark in post, but you can’t rescue detail that was never recorded. Use a light meter or your camera’s exposure meter: ensure key parts of the image are within a good range. If you want a dark scene, it’s better to use a few strategically placed lights for contrast rather than have no light at all. For example, a single dim lamp next to your singer’s face in an otherwise dark room can look intentionally low-key, whereas filming them in near darkness will just look like a mistake and produce tons of image noise. Remember Ari’s observation that iPhones and cheap cameras “don’t do well in low-light situations”[2] – this holds for most cameras to varying degrees. So don’t skimp on giving the sensor light. Even a couple of candles or a faint fill can separate a cool dark scene from an unusably dark one. Check your footage – if it’s full of color noise or the subject’s face is hard to see, adjust by adding light or opening up your aperture.
- No Separation (Subject Blends into Background): Another mistake is not creating any separation between your subject and the background. This often happens when everything is lit with one frontal light or everything is in focus and evenly lit. The result is the artist looking “flat” within the scene. A hallmark of cinematic lighting is that the subject is visibly separated – through backlight (rim lighting) or contrast or shallow depth of field – from the background. If you notice your performer kind of melding into a cluttered background, consider adding a backlight or edge light behind them, which will outline their shape and pull them out from the backdrop[9]. Or dim the background lights so the subject is relatively brighter. Even using color contrast (e.g. subject lit warmly, background lit cool) can help separation. Failing to do this can make your video look like a single flat layer. So ask yourself: does my subject visually stand out? If not, tweak the lighting – often just positioning a light behind at a low intensity is enough for a nice rim on shoulders and hair.
- Not Lighting the Scene (Only the Subject): Beginners might focus all lighting on the artist and forget about the environment. This can result in a well-lit singer against a completely dark or unconsidered background, which feels uncinematic. Remember to light (or intentionally shadow) your environment in line with your story. In a performance video, this could mean having some light on the background elements (instruments, dancers, set pieces) so the scene doesn’t look like it’s floating in space. Or if it’s a narrative scene in a room, maybe throw a pattern of light on the wall or light up some practical lamp in the back to give context. One lighting pro describes how in The Godfather film, they even lit background extras and architecture subtly to create depth[28] – similarly, in your video, a cheap lamp lighting the wall or a color on the background can add richness. A common mistake is to have a nicely lit face but everything behind is either pitch black or lit in a way that draws attention away from the subject. Strive for balance and intentional lighting of the space. If the background is supposed to be dark and minimal, that’s fine – just ensure it’s a conscious choice and not because you forgot to add a light or two. Conversely, don’t over-light the background either; if it’s brighter than the subject, it can steal focus and look odd. Aim for the subject to usually be the brightest or most color-attractive part of the frame.
- Lack of Planning and Testing: It may not be a specific lighting “look” mistake, but not testing your lighting setup before hitting record is a frequent pitfall. You might set up what looks cool to your eye, but the camera might see it differently (exposure, color, and shadow-wise). It’s a mistake to assume it’s fine without doing at least a quick test shot. Always test and adjust your lighting setup before the actual take[29]. This way you can catch issues like a harsh shadow, a reflection or glare, or a weird color mix before the artist performs and you waste a take[29]. Another planning mistake is not considering continuity – if you have multiple angles, make sure your lighting setup doesn’t drastically change between shots (unless intended). Mark your light positions with tape so if you move them you can go back. Taking a few minutes to plan and check can save your video from looking inconsistent or poorly lit in some shots.
By being mindful of these common errors, you can sidestep the amateur look. In essence, avoid anything that makes the lighting draw negative attention – whether it’s unflattering on your talent, inconsistent across shots, or just not supporting the story. Instead, aim for lighting that looks effortless and natural to the viewer (even if you spent a lot of effort to craft it!).
Experiment, Plan, and Pre-Light for Success
Lastly, an important part of making your music video look expensive is embracing the creative process of lighting. Lighting is as much art as science – so experiment and practice as much as possible. Try out different setups in rehearsal or test shoots. For instance, take a doll or have a friend stand in, and practice lighting them in a scene before the artist arrives. Move the lights around, change the color gels, adjust the distance and see how it looks on camera. This kind of pre-lighting and testing is something professionals do all the time. A cinematographer might spend hours the day before a shoot pre-lighting a set so that on the day of filming, everything is ready to go[30]. You can do a scaled-down version of this: if you have access to your location early, go in and set up some lights, see what happens if you turn off the overheads, how the window light looks at a certain time, etc. Planning ahead will make your shoot day much smoother and ensure you get the cinematic look you want. Even giving yourself 10-15 minutes before filming to tweak lighting can make a difference – one filmmaker advises to “rehearse and pre-light simultaneously” so you can dial in the look before rolling[31].
Don’t be afraid to get creative and break rules during experimentation. Maybe you normally wouldn’t light someone from below, but for a specific eerie shot, try using a smartphone flashlight under the chin for a horror-like effect. Or experiment with shadows – put a colander in front of a light to cast dotted shadows, or shine light through tree branches to get a pattern on the artist. Some experiments won’t work, and that’s fine – you can discover your own signature techniques this way. Lighting is an artistic endeavor with no one “right” way to do it[32]. The more you play with it, the better you’ll understand what looks cinematic and what doesn’t. Over time, you’ll develop an eye for it.
Also, involve your team or friends in this process. Sometimes another set of eyes will catch a weird shadow or suggest a cool idea (like “What if we backlight through a fog machine?”). If you’re a one-person crew, consider making a checklist or mood board for lighting. Gather screenshots of music videos or films that have lighting you love and analyze them – where are the shadows, what color is the light, how many directions is it coming from? You can then try to replicate that vibe with your resources. Say you love the way a Drake video has a neon gel look – you might note “okay, they used a pink light from the left and a blue fill from the right” and attempt a similar two-tone lighting on your set with gels.
Importantly, give yourself permission to improvise on set if needed. Maybe you planned a lighting setup but it’s not working; don’t be rigid – try moving the light, or turning one off, or adding an extra practical. Some of the best happy accidents happen when you try something unexpected. If you have an extra LED strip lying around, you might suddenly realize it would look great outlining a doorway in the background – go for it. This kind of on-the-spot creativity can add production value in ways you didn’t initially plan.
Finally, practice makes perfect. Try lighting small scenes at home regularly – for instance, film a 30-second performance in your room with different lighting each time (one with only candles, one with a DIY softbox, one with dramatic colored lights) to see how each change affects the look. You’ll build a mental library of techniques that you can deploy when it’s time for your real music video shoot. The more comfortable you are with lighting, the more confidently you can make a cheap video look like a million bucks. As a No Film School article encourages: you likely have more lighting potential around you than you think, so “if you know what you have, you’ll know what you can do”[15] – and you can do a lot without a professional kit.
In the end, planning and experimentation cost nothing, but they can save you from costly mistakes and elevate your video’s quality immensely. So take the time to pre-light and tweak, and don’t be afraid to play with lighting ideas. With every shoot, you’ll get better and faster at creating that expensive-looking cinematic lighting.
Conclusion: Light Like a Pro on a Budget
Lighting is the secret sauce that can transform your music video from ordinary to cinematic. The best part is, you don’t need a blockbuster budget – just knowledge, creativity, and a willingness to experiment. We learned that lighting trumps gear: an iPhone video with great lighting will impress more than a 4K video with lousy lighting[1][2]. By mastering principles like contrast, color temperature, softness, and motivated lighting, you can craft compelling visuals that suit your song’s mood. We saw how our favorite hip-hop and R&B videos use techniques like colored gels, backlights, and practicals to create atmosphere – tricks you can mimic with inexpensive tools. From using the golden hour sun as your personal spotlight to rigging up DIY diffusers and reflectors, there are countless ways to get an expensive look for little to no cost.
Remember to avoid the common pitfalls (no flat front-lighting or random mixed colors, please!) and always keep an eye on what the light is doing in your frame. When in doubt, take a step back and ask: does this lighting tell the story I want and flatter the subject? If not, adjust it – move a light, add a gel, flag off something – small changes can have big effects. The beautiful thing about lighting is that it’s highly adjustable and iterative; you can keep fine-tuning until it feels just right. So approach it with a problem-solving mindset and don’t get discouraged if the first try isn’t perfect.
With these tips and a bit of practice, you’ll be well on your way to making music videos that look like they were shot with a high-end crew – even if it’s just you and a couple of LEDs in your garage. Great lighting can make a cheap video look cinematic and expensive-looking[33][2], and now you have the know-how to do it. So go ahead and light up your scenes with confidence. Your music and vision deserve to shine – literally! Good luck, and happy lighting.